Membrain Keypad 3x4 Numeric Matrix Array
-
RM6.50
- Product Code: Keypad Membrain 3x4
- Availability: In Stock
Punch in your secret key into this numeric matrix keypad. This keypad has 12 buttons, arranged in a telephone-line 3x4 grid. It's made of a thin, flexible membrane material with an adhesive backing (just remove the paper) so you can attach it to nearly anything. The keys are connected into a matrix, so you only need 7 microcontroller pins (3-columns and 4-rows) to scan through the pad.
Key Features:
Application Ideas:
Features:
How it worksMatrix keypads use a combination of four rows and four columns to provide button states to the host device, typically a microcontroller. Underneath each key is a pushbutton, with one end connected to one row, and the other end connected to one column.
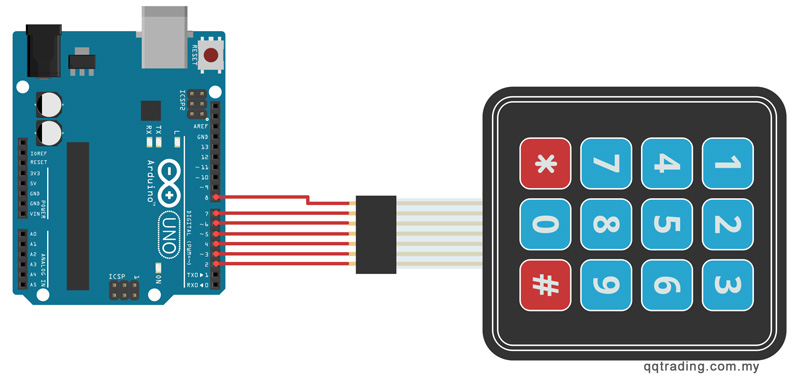
When connecting the pins to the Arduino board, we connect them to the digital output pins, D8-D2.

You can download the Keypad library here: Keypad Library. When you download, change the name to folder to something other than Keypad. If the folder and the file you are importing have the same name, it won't work.
/*3x4 Matrix Keypad connected to Arduino
This code prints the key pressed on the keypad to the serial port*/

#include <Keypad.h>

const byte numRows= 4; //number of rows on the keypad
const byte numCols= 3; //number of columns on the keypad

//keymap defines the key pressed according to the row and columns just as appears on the keypad
char keymap[numRows][numCols]=
{
   {'1', '2', '3'},
   {'4', '5', '6'},
   {'7', '8', '9'},
   {'*', '0', '#'}
};

//Code that shows the the keypad connections to the arduino terminals
byte rowPins[numRows] = {8,7,6,5}; //Rows 0 to 3
byte colPins[numCols]= {4,3,2}; //Columns 0 to 3

//initializes an instance of the Keypad class
Keypad myKeypad= Keypad(makeKeymap(keymap), rowPins, colPins, numRows, numCols);

void setup()
{
   Serial.begin(9600);
}

//If key is pressed, this key is stored in 'keypressed' variable
//If key is not equal to 'NO_KEY', then this key is printed out
//if count=13, then count is reset back to 0 (this means no key is pressed during the whole keypad scan process
void loop()
{
   char keypressed = myKeypad.getKey();
   if (keypressed != NO_KEY)
   {
      Serial.print(keypressed);
   }
}
With this code, once we press a key on the keypad, it should show up on the serial monitor of the Arduino IDE once the code is compiled and uploaded to the Arduino board.
Tags: Keypad